
How do you turn a neglected 1980s Fairline Corniche 31 into a bright and modern family cruiser for less than £10,000? Former naval engineer and eBay fanatic Ross Barrett shares his story...
When I stop and think, “when did my boating life begin?”, it always makes me smile. My earliest memory dates back to when I was on holiday as a child in Mallorca watching a family eat pasta on the back of a motor cruiser as the sun went down.
Somehow that vision etched itself into my brain as my idea of holiday heaven and it’s a dream I have clung to ever since. When my dad bought a little fishing boat a few years later it only served to stoke the flames, as did a couple of weeks’ work experience at Northney Marina when I was 15, helping to clean, refuel and move boats around.
These early boating experiences helped steer me towards a career as a mechanical engineer, working for the Ministry of Defence at a Portsmouth naval base.
Being involved with ships and living close to the sea helped keep the dream alive of one day being able to own my own boat but it wasn’t until I returned from a four-year stint working in the Middle East that I decided it was time to take that first step.
We’d only recently bought a house so my wife wasn’t entirely thrilled at the prospect of me spending more money on a boat so we compromised and bought a 3.2m inflatable dinghy with a 3hp outboard on the back.
It wasn’t quite what I had in mind but at least it got us afloat. It was great fun and we spent a lot of time pottering up and down the Hamble. But I kept looking at all the people having fun on their larger cruising boats, wishing it were me.
Eventually, I managed to save up enough money to buy something bigger and in 2015, at the age of 35, I went in search of my first proper boat. I settled on a 1999 26ft Sea Ray Sundancer which I managed to negotiate down to £18,000.
I remember staring across the bow wondering how I was going to helm such a large boat. Needless to say I soon got used to it and loved the freedom it gave us. Weekends and day trips were incredible, which only fuelled my desire to cruise further afield and stay on board for longer periods.
Article continues below…

Fairline Squadron 58 owner’s upgrade: £90k designer refit by Setag Yachts

Owner’s upgrade: How I turned my Princess V48 convertible into a coupe cabriolet
We now had a young daughter as well as an older son so space was tight and it soon became evident that we needed a larger vessel.
An evening with friends aboard a Fairline Targa 34 with its comfortable cabins, proper shower compartment and big galley really brought home what we were missing. I went to the Southampton boat show to get a feel for the size and style of boat we were looking for.
It was an eye-opening experience but also left me thinking that either I needed to win the lottery or find a smarter way of making my dream come true. Given that the odds of the former were 1 in 45 million, I decided to go with the latter.
Having researched motor cruisers in the 30-35ft range, I soon realised that my budget of £35k would only stretch to a well-used 1980s boat without the light, spacious, stylish interior that I had spent hours drooling over at the boat show.

Prior to the refit Ross’s Fairline Corniche 31 looked tired and dated but the hull was sound
After scanning mutiple brokerage adverts I finally spotted an eBay listing for a Fairline Corniche 31 for sale in Ocean Village that fell within my budget. It was described as being in ‘turnkey condition’.
What’s more the vendor was looking to downsize to a smaller craft and would consider a part exchange. Given that we would need to sell our Sea Ray to fund the new boat, it sounded like the perfect match.
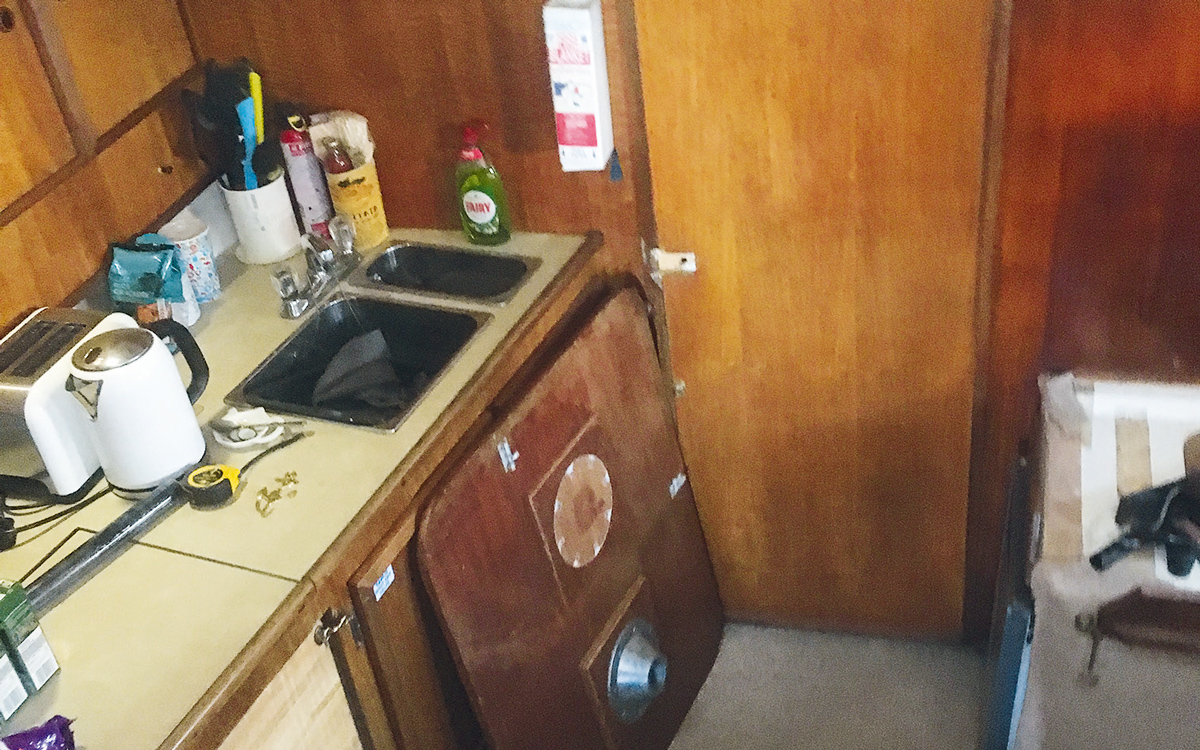
I arranged a viewing of the Fairline Corniche and hurried over to take a look. What most people would have seen was a ghastly green-patterned interior, a mish-mash of curtains, an extremely frayed brown carpet held together with masking tape, a leaking canopy and a grimy exterior covered in algae stains.

Patterned upholstery, frayed brown carpets, grubby galley and dated helm didn’t live up to Ross’s dream of a modern family cruiser
However, what I saw was myself sat in a comfy chair in the cockpit, sipping a glass of wine and enjoying a bowl of pasta as the sun dipped below the horizon. If the viewing didn’t shatter the lenses of my rose-tinted spectacles, the sea trial certainly did.
Firstly, the port outdrive lost power, then the starboard one kicked up every time it was put into reverse. Once the port engine was working again it soon overheated and most of the navigation equipment must have been taken from Noah’s ark.
That said, if you were to buy a boat on anything other than a dream, then you would probably never buy one at all. Sensing an opportunity and seeing how smitten the owner was with the much better condition of my SeaRay, which I’d spruced up with new carpets and upholstery, I offered him £31,000.

Given that he’d already agreed to take the Sea Ray in part exchange for £26,000, that meant I only had to find another £5,000. Much to my surprise he accepted my offer and even agreed to fix the failed bearing on the port sterndrive at his own expense.
With the deal done, I nursed my ailing purchase back to her new home in Portsmouth and set about the basic repairs needed to get her seaworthy.
At this stage I wasn’t planning to embark on a major refit, just tidy her up by throwing in some scatter cushions, a few plug-in air fresheners and some new carpet, then go and enjoy her.
Initially, that’s exactly what we did but after a year of cruising the Solent, visiting various marinas, we began to recognise the limitations of the layout as well as all the many other issues that had begun to grate.
By August 2019, I knew that I had to take more drastic action. Not only was I starting to loathe the dated décor but with three of us crammed into the solitary front cabin, it wasn’t the most relaxing or enjoyable of experiences and a far cry from the dream I’d held onto for so long.
I knew the boat had the potential to be so much better than this. The issue was how to realise that potential while spending less than my meagre refit budget of £10,000.
The refit begins
When Fairline launched the Corniche in 1984, it offered more than 60 possible configurations, with one or two cabins and a variety of engine and drive options.
Georgia had a single cabin layout and was powered by a pair of 200hp Volvo Penta TAMD 41B diesel engines on Volvo 280 sterndrives. The layout consisted of a forward cabin in the bow with a galley and dinette amidships and heads compartment at the foot of the companionway stairs.
Knowing that other layouts were possible and having viewed hundreds of Fairline Corniche photographs online, I was confident that I could adapt our boat’s layout to better suit our needs.
I set about researching ideas by visiting the Southampton boat show again to see why a modern 31ft craft appeared to have so much more space than ours.
As well as making better use of the space, they had lots of clever features like televisions that lifted out of cabinets and beautiful wine glass racks hidden behind panels.
Combined with LED mood lighting and lighter coloured soft furnishings, they looked and felt so much more modern and spacious. I must have taken in excess of 1,000 photos that day of everything from design layouts and colour schemes to materials, lights and sockets.
Noting the eye-watering price tags, I also kept asking myself whether it was even possible to turn a 1980s boat such as ours into something that looked more like the luxurious £150,000 cruiser I aspired to, especially on our limited budget.

Solitary forward cabin meant sharing the space with their young daughter
I came to the conclusion that it was possible to create the boat of my dreams but only if I were to do all the work myself. My first goal was to find a way of creating a second cabin so that our daughter could have her own space and we could have ours.
We also wanted a modern galley, saloon and cockpit so that we could cook, eat and entertain on board. If we could nail this, it would finally be the comfortable second home we dreamed of that would allow us to cruise further afield as a family.
With a plan lodged in my head, a clear vision of what we wanted it to look like and some rough scale drawings of how the new layout would work, I finally set to work on 5 January 2020.

Hidden voids and non-structural bulkheads revealed pockets of unused space that would come in handy for his revised layout plans.
The first job was to strip out everything right back to the bare fibreglass hull so I could see what we had to work with. A colleague of mine who was a naval architect helpfully came down to the boat to point out what was or wasn’t structural and with his blessing I removed the non-structural bulkhead that separated the starboard end of the saloon from the dinette below.
Of course once I’d removed all the ceiling panels and floorboards, I discovered an absolute rabbit warren of electrical cables running through the boat, nearly all of which were unmarked and had clearly been added at different stages of its life.
Cable carnage
After a while I gave up trying to work out what was what and decided to strip out everything that wasn’t marked on the original Fairline drawings as part of the essential 12V DC wiring. That meant starting afresh on the AC wiring, which I relaid using new colour-coded Arctic cable bundled together in galvanised trunking and clearly marked for ease of identification.

Stripping out the forward cabin enabled Ross to see what he could do with the space
I did the same for all the new and existing 12V cabling to keep the AC and DC cable runs completely separate. I then built a brand new switchboard using 3mm Traffolyte board and proper breaker switches that I’d bought on eBay to replace the old Euro fuses.
I designed it all on Powerpoint as it was the only programme I knew how to use, then carefully cut out the holes for the breaker switches using a drill and Dremel multi-tool before soldering all the new connections.
The final touch was engraving the names of each electrical circuit onto the board for easy identification. Wherever possible I stuck with 12V power for things like the fridge and television, so we could run as much as possible on battery power away from the marina, then added an inverter for 240V items like the kettle.

A birds nest of wires and plumbing had to be removed before he could start afresh
The newly added shorepower system would kick-in when we were in harbour, meaning I could strip out the old gas cooker and install a cleaner, safer electric hob and oven.
I also designed a separate ‘winterisation circuit’ with a thermostat in the engine bay and saloon linked to low power heaters that switch on when the temperature drops below 11 degrees.
Engines and sterndrives
The next job was sorting out the engineroom and mechanicals, while the boat was a bare shell. We still had the overheating problem on the port engine, which I just couldn’t get to the bottom of.

Ross stripped and reconditioned all the engine ancillaries and sterndrives, cleaned and painted the bilges, then resprayed the blocks in situ
I had replaced the raw water impeller and flushed out the cooling system with Rydlyme descaler but nothing seemed to work. Finally, I asked my wife to stand at the helm and apply power while I was down in the engineroom.
The instant she revved up the port engine the main raw water hose collapsed in on itself from the suction of the impeller. Further investigation revealed all the brass seacocks had seized so I removed all of them and the rubber hoses and replaced them with Trudesign composite seacocks that are maintenance-free and impervious to corrosion.
While I was at it, I degreased the entire engine bay and painted it with white Flag bilge paint. I tried two or three different brands and found Flag’s to have much the best opacity as well as sticking to anything and drying rock hard.

The end result is a gleaming engineroom with LED lighting and a video feed to the helm
I do all my own engine servicing so I knew the old TAMD 41Bs were in good shape internally but visually they were looking a bit sorry for themselves so I decided to repaint them too.
I couldn’t afford to bring in a professional to do this so I rubbed them down by hand and bought an electric spray gun on eBay. I practised on some of the ancillaries I’d removed first before painting the main blocks with two coats of two-pack primer and three coats of Volvo green paint.
I’d photographed the old Volvo graphics before removing them and measured up the dimensions so I could send them to a vinyl printing company, who made up a fresh set of heat resistant stickers for £15.
To make servicing easier, I added a set of LED engineroom lights and fitted a waterproof dome security camera, which I’d bought for £12, you guessed it, on eBay. I managed to connect this to the Raymarine chartplotter using the BNC input so I can now view a live feed of the engine bay when we’re out at sea without having to inspect it myself.

Both sterndrives were removed and rebuilt in Ross’s garage using an old Volvo Penta manual.
Having sorted out the engines, the sterndrives were now in need of attention and nothing less than a full rebuild would satisfy my goal of a really safe, reliable, comfortable boat.
I managed to find an old Volvo workshop manual on eBay with step-by-step photographs showing how to strip down and rebuild a 280 sterndrive. Using this as my guide, I removed both legs and took them home so I could work on them over Christmas.
Given that we were in lockdown over the festive period, it was the perfect opportunity to get stuck in! Once rebuilt, I repainted them with two-pack grey paint and repeated my trick with the Volvo stickers.

A full respray with DIY printed decals added the finishing touch
Helm rebuild
The final piece of the engineering jigsaw was sorting out both helm stations. Half the gauges weren’t functioning properly, the plastic surrounds had chipped corners, the old Volvo throttles looked dated and had become stiff to operate, the helm wheels were worn and corroded and the equipment was a mish-mash of different items added over the years.
I decided to start again from scratch. First I photographed all the gauges and switchgear before removing them, then I transferred all the shapes and sizes onto Powerpoint so that I could move them around and see what fitted.
I found space to add new elements including a GPS speed readout, new Bluetooth stereo head unit and an overdrive light from an old Jaguar to show me when the outdrive legs were lifted.

Ross designed the new helm on Powerpoint then built it himself using a mix of new and original gauges and throttles
Once I was happy with the new layout, I made up my own fascia panels from sheets of black plastic which I cut to size, drilled out and engraved with the Volvo logo just like the old ones.
Some of the old warning lights had to be drilled out of the old panels and plastic welded back into the new ones but I managed to fit them in seamlessly before rewiring them all.
For the dashboard itself, I bought some diamond-stitched black leatherette which I backed with foam to give a more luxurious soft-touch feel. I managed to buy a new Teleflex transfer unit to transfer control from the lower to the upper helm for £50 on eBay, along with a pair of new steering wheels from Aquafax and stainless steel MT3 throttles.

Flybridge helm now replicates all the major functions and gets matching MT3 throttles
For the finishing touch I made up some Fairline logo stickers to put in the centre of the wheel. The finished helms now look much smarter and more modern with all the added functionality I was hoping for.
With the engines and electrics sorted that just left the small matter of refitting an entirely new interior but that’s a whole other story in itself which I’ll tell you about in next month’s issue…
To read part 2 of Ross’s Fairline Corniche refit story, pick up the November issue of MBY, which is out on October 7.